
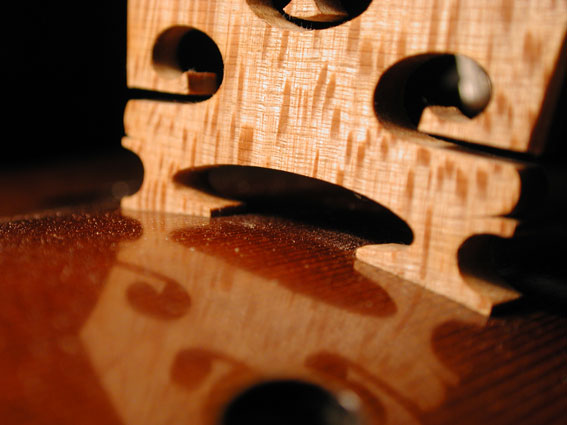
The Brigde
Fitting the bridge is for the sound of an instrument very important.
After all, this small piece of wood is the point at which the strings'
vibrations are carried to the instruments body. Normally maple is the
material used, as it exhibits pronounced medullary rays.
Various raw castings for bridges are available in violin building.
Several firms in Europe have a very long tradition when it comes to this
craft. Two important companies worth mentioning are the French bridge
manufacturers Aubert in Mirecourt and Despieau, the first manufacturer
to use laser cutting techniques. I would also like to mention the German
companies Stamm, Schuster and Teller, although when it comes to
high-quality instruments, we prefer the Deluxe bridge model from Aubert
in France. When it comes to historical or particularly "delicate" cases,
we build our own bridges with raw castings in our own workshop. In this
case the bridge is designed exactly for that instrument only.
What is important to consider about the bridge?
First of all, one should consider what the reason for needing a new bridge could be.
Do the reasons behind changing a bridge have to do more with tonal
questions or with playing technique? If it is the latter, and the
instruments sound with the old bridge is very good, then one should use
wood which exhibits similar sound distinction and stability qualities to
that of the old bridge.
If a new bridge is to improve the sound quality of an instrument, these
tonal changes can be achieved by using a harder or softer type of wood.
But also the arrangement of the bridge cuttings can later have a great
affect upon the sound of the instrument.
First some general information:
- The width of the bridge should not exceed the width of the upper f balls.
- The bridge should be in the acoustic center, on the imagined line between both f-hole notches.
- The bridge should lie exactly aligned to the fingerboard in order that both the highest and lowest strings have the same distance to the fingerboard's edge.
- The violin's bass bridge foot should protrude about 1 to 2mm over the bassbar.
(With violas it should be about 2 to 3mm, with cellos about 3 to 5mm, depending upon the instrument's size in each case.) - The bridge should sit exactly between the f-hole notches

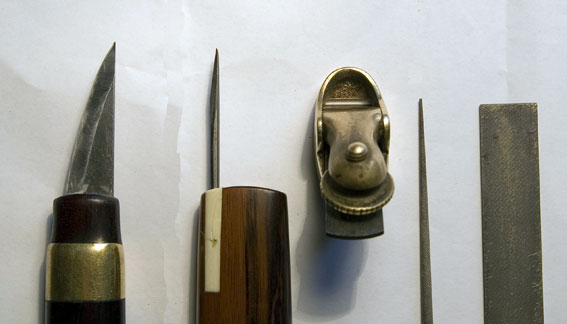
When cutting out the bridge in violin making, the following tools are needed:
- 2 woodcarving knives. Normally we make the handles ourselves so that they are in the hand perfectly. For the bridge we take a wide one to adjust the belly's feet und a narrow one to deepen the openings.
- A small plane to increase the bridge's strength,
- a flat file and smaller round files,
- a sandpaper file for final smothing and
- a pattern for rounding the bridge are used.
The first task is planing the bridge feet for strength.
For a violin bridge this represents approximately 4.5mm.
The next task is adjusting the bridge feet to the belly curvature. This demands extremely precise skill as the accuracy of the fit is decisive when it comes to optimal vibration propagation.
Somewhat more has to be cut away here. This is down with the "big" woodcarving knife as seen in the tool photo.

This type of cutting requires sharp tools and a calm and able hand.
The feet must be adjusted in such a way that the reverse side of the bridge (the part that shows to the tailpiece) stands at a right angle to mathematical base area. Being that the front of the bridge is arched, it appears is if the bridge is slightly inclined toward the tailpiece.
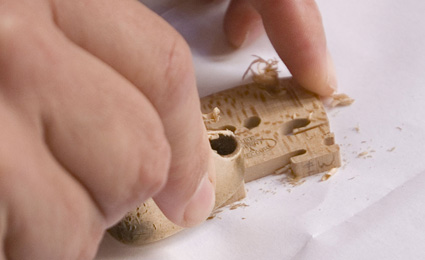
The cut-outs, the feet and their connecting bow (also referred to as bridge in violin making) are trimmed with the narrow woodcarving knife. The size and the form of these cut-outs, as well as the forming of the feet, have a significant effect upon the acoustic properties of the bridge and, therefore, the instrument.

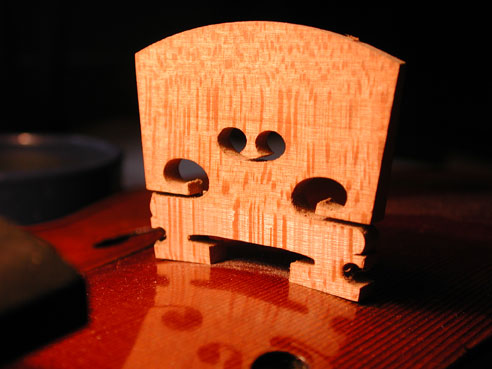
One the bridge fits perfectly within the belly curvature, the bridge rounding and height can be determined.
The bridge rounding must be formed in such a way that lets every string be easily and individually bowed without making fast changes to other strings difficult.
The height of the bridge is individually adjusted to match the playing qualities and string selection of the given musician. Playing solo demands just as high a lateral position as do using gut strings, for instance, which display a higher vibration amplitude as synthetic or steel core strings.
The thickness of the bridge also brings variation to the tone of the instrument. One only needs to think of the tonal effect muting has, which represents nothing other than a complete raising of the upper part of the bridge.
The arching at the front of the bridge, the part that faces the fingerboard, is taken care of with the finger plane.

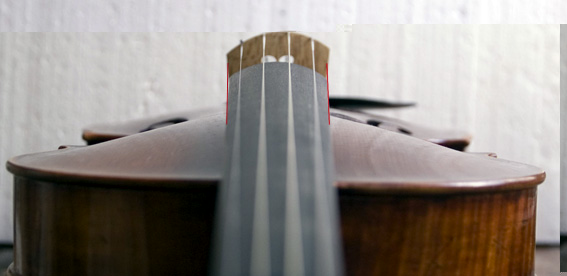
Traces of the planing are removed with a precision file and then the bridge is aligned.
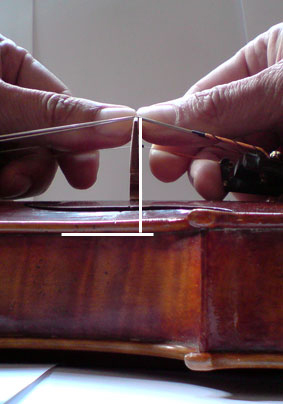
This picture shows only the fitting accuracy of the brigde without string pressure! Even without tension of strings the brigde feets must adjust all-about. The cut-outs in the brigde must then be created individually according to the instrument´s sound condition. Should the bridge move during tuning or incline in one direction or the other when new strings are wound, place it carefully back in the proper position.
Do you have questions about this subject?
You have two ways of stilling your curiosity:
You can place your question in our forum, then others who interested in the question might get something out of it, or you ask us directly using our contact form.
Any Questions about brigdes?
Comment by Sarah |
Hi,
My bridge just snapped and I was wondering if I could just fit it on my violin myself. Does it have to be cut/adjusted for my violin in particular?
Thanks,
Sarah
Comment by Haat-Hedlef Uilderks |
Hi Sarah,
for an optimal sound you have to be cut and adjusted the brigde for your violin in particular. The bridge is very important for the sound.
Best wishes
Haat-Hedlef
Comment by Augustus McCormick |
Hello,
For playing solo would the string hight need to be higher than "standard". I really like to really get in to the string and I was wondering if the strings were set higher would this increase brilliance or am i confusing that with a higher heart.
Also would it be unorthodox to request that the arch of the bridge be increased? Specifically making the d and g higher and increasing the distance between strings but not too much to where I a cant play double stops comfortably. I have recently replaced a bridge who's arch was really flat. It was so flat that when I tried to play fortissimo on the d string it was impossible not to play three strings.
Ad Astra Per Aspera
Agustus McCormick
Comment by george sharp |
Hi,( fiddles like a flatter bridge.)..it seems that the height of the bridge is ...probably..only dictated by the height of the strings over the fingerboard..if you increase the string height too much, it may be impossible to play well in the higher positions--eg. require excessive finger pressure to stop a string past 5th position..slowing speed and upsetting tone....
therefore it would seem that the closer to 'standard' string height over the end of the fingerboard is advisable....however there is enough leeway on the lower strings to experiment with 1 or 1.5 mm
above 'normal'...for the classic violinist....And be sure your bow is properly tensioned...
Comment by Haat-Hedlef Uilderks |
....The height of the bridge is individually adjusted to match the playing qualities and string selection of the given musician. Playing solo demands just as high a lateral position as do using gut strings, for instance, which display a higher vibration amplitude as synthetic or steel core strings.......
Comment by John Wright |
I am a violin refurbisher. I am currently working on a good quality violin that plays shrill, too bright in the high registers, and is unpleasant. If I put a clothes pin on the bridge under the E string close to the foot it sounds much more mellow and satisfactory. Therefore it appears that tuning the bridge should be done. What should I do to the bridge to mellow and lower the high pitches? I can't find tuning instructions for the bridge. Lots of sites say it is very important, but do not say if it is too bright cut open the lower holes etc. Where can I find this information on tuning the bridge to get this or that effect? Thank you for taking my comment
Comment by Marek Orkiszewski |
Hello,
I was advised by my Gypsy violin teacher to exchange my bridge for the one with narrower spacing between strings. His violin with narrow spacing fits me better than my own violin with standard spacing. I have a rather slim hand with narrow fingers. Should I do anything about it?
Regards
Marek Orkiszewski
Comment by LARRY V MILLER |
I have bridges that are too thick. Can I plane them down? Do I plane the front or back? Thanks.
Reply by Haat-Hedlef Uilderks
Hi,
yes, you can plane them thinner. Only plane the side facing the fingerboard. The other side stays straight.
After planing, file and grind the surface.